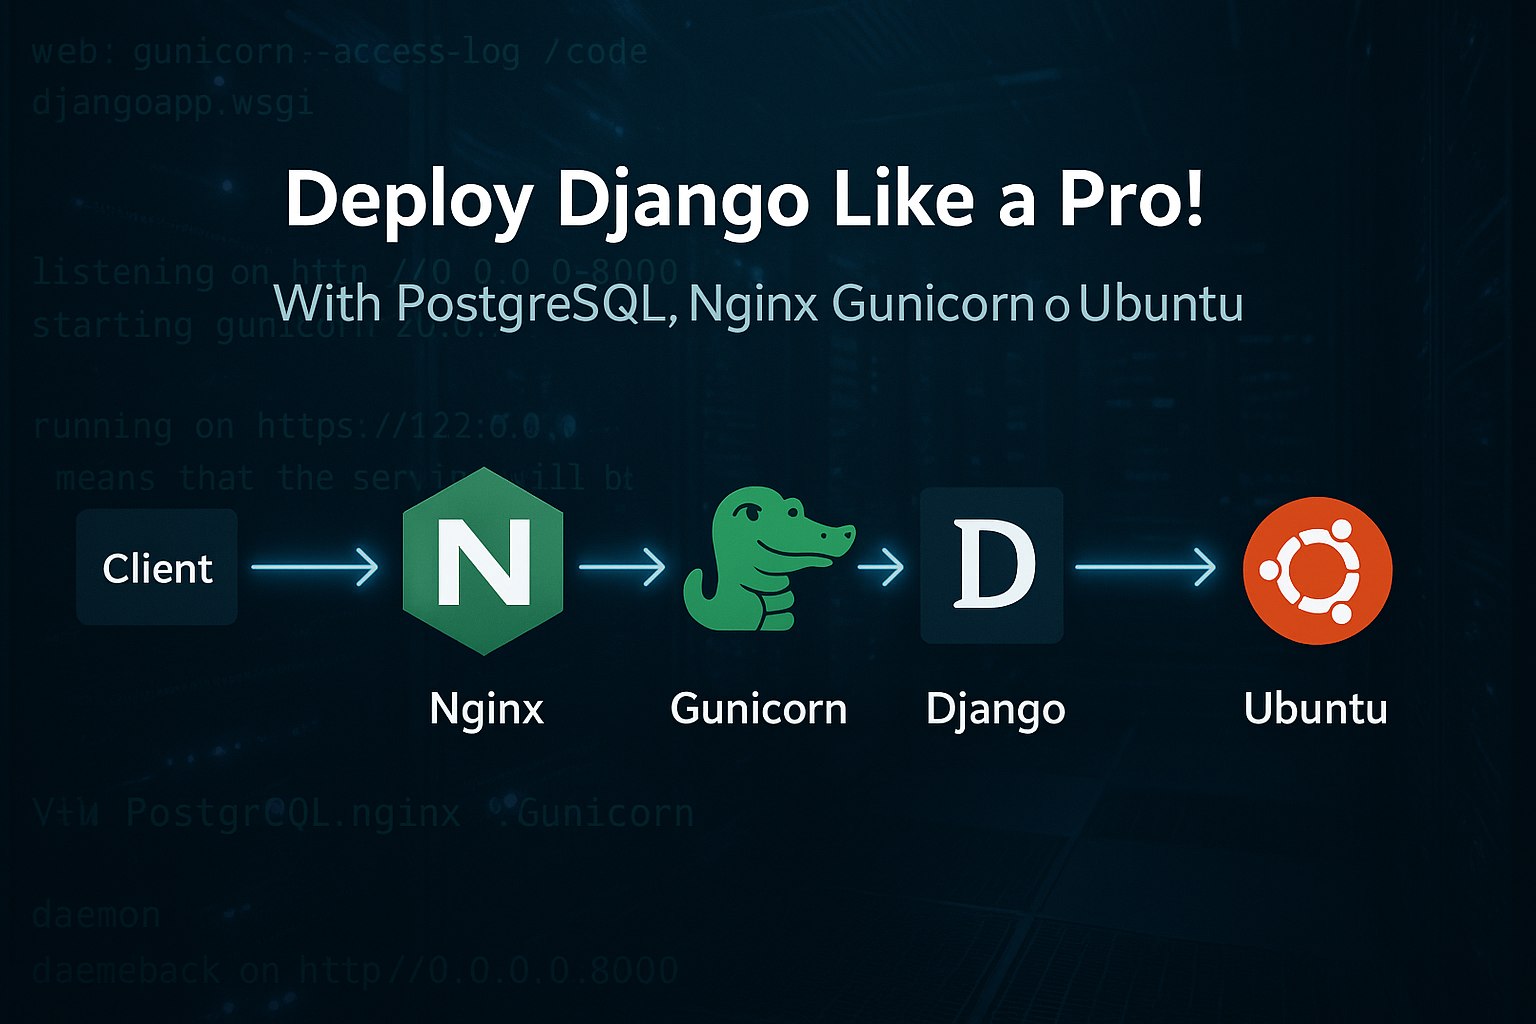
Setting Up a Django Application with PostgreSQL, Nginx, and Gunicorn on Ubuntu
This guide walks you through deploying a Django web application using PostgreSQL, Gunicorn, and Nginx on Ubuntu.
🔧 Project Structure
- Django Project Root: /var/www/project_name/src/
- Virtual Environment: /var/www/project_name/venv/
- manage.py is located inside src/
Step 0: Prepare Project Directory & Clone Code
# Create project folder and navigate
sudo mkdir -p /var/www/project_name/src
cd /var/www/project_name

# Create virtual environment
python3 -m venv venv

# Activate the environment
source venv/bin/activate

# Move to source directory
cd src

# Initialize Git and pull code
git init
git remote add origin https://your-repo-url.git
git checkout -b production
git pull origin production
Step 1: Install Required Packages
sudo apt update
sudo apt install python3-pip python3-dev libpq-dev postgresql postgresql-contrib nginx curl
Step 2: Configuring PostgreSQL
PostgreSQL will store your application’s data. Create a database and user for your project.
Log in to PostgreSQL:
sudo -u postgres psql
Inside the PostgreSQL prompt, run:
-- Create a database
CREATE DATABASE myproject;

-- Create a user with a secure password
CREATE USER myprojectuser WITH ENCRYPTED PASSWORD 'your_secure_password';

-- Grant privileges and set ownership
GRANT ALL PRIVILEGES ON DATABASE myproject TO myprojectuser;
ALTER DATABASE myproject OWNER TO myprojectuser;

-- Exit PostgreSQL
\q
Step 3: Set Up Your Django Project
cd /var/www/project_name
source venv/bin/activate
cd src/
pip install -r requirements.txt
Update project_name/settings.py with your database config:
DATABASES = {
    'default': {
        'ENGINE': 'django.db.backends.postgresql',
        'NAME': 'myproject',
        'USER': 'myprojectuser',
        'PASSWORD': 'your_secure_password',
        'HOST': 'localhost',
        'PORT': '5432',
    }
}
python manage.py makemigrations
python manage.py migrate

# Before running collectstatic, ensure this is in settings.py:
# If your 'static/' folder is at the same level as manage.py:
STATICFILES_DIRS = [os.path.join(BASE_DIR, 'static')]
STATIC_ROOT = os.path.join(BASE_DIR, 'static')
STATIC_URL = '/static/'

python manage.py collectstatic
Step 4: Set Up Gunicorn
cd /var/www/project_name
source venv/bin/activate
pip install gunicorn
cd src
gunicorn --workers 3 --bind unix:/var/www/project_name/gunicorn.sock project_name.wsgi:application
(Replace project_name.wsgi with the actual Python path to your WSGI module.)
Step 5: Create Gunicorn systemd Socket and Service
We will use systemd to manage the Gunicorn process. This includes creating both a socket unit (to listen for connections) and a service unit (to launch Gunicorn).
➤ Create the Gunicorn Socket Unit
Start by creating and opening a systemd socket file for Gunicorn:
sudo nano /etc/systemd/system/gunicorn.socket
Paste the following content:
[Unit]
Description=gunicorn socket

[Socket]
ListenStream=/run/gunicorn.sock

[Install]
WantedBy=sockets.target
This socket will listen for incoming connections and activate the Gunicorn service only when needed. Save and close the file after editing.
➤ Create the Gunicorn Service Unit
Next, create the Gunicorn service file:
sudo nano /etc/systemd/system/gunicorn.service
Paste the following content:
[Unit]
Description=gunicorn daemon
After=network.target

[Service]
User=root
Group=www-data
WorkingDirectory=/var/www/project_name/src
ExecStart=/var/www/project_name/venv/bin/gunicorn --access-logfile - --workers 3 --bind unix:/var/www/project_name/gunicorn.sock project_name.wsgi:application

[Install]
WantedBy=multi-user.target
Make sure to replace project_name with your actual Django project name or path.
🛠️ Note: You should use a non-root user (e.g., www-data) for security in production, instead of User=root.
After saving both files, continue with starting and enabling the socket and verifying that Gunicorn is working properly (see Gunicorn verification section above).
🧪 Verifying Gunicorn Socket Activation
Once your gunicorn.service and gunicorn.socket files are set up, start and enable the socket unit:
sudo systemctl start gunicorn.socket
sudo systemctl enable gunicorn.socket
This sets up the socket to listen for incoming requests and automatically trigger Gunicorn when needed.
You can confirm the socket is working by checking its status:
sudo systemctl status gunicorn.socket
If everything is configured correctly, the socket should be active (listening). Next, verify that the socket file has been created:
file /run/gunicorn.sock
If the socket is missing or the service is failing, check the logs for more detail:
sudo journalctl -u gunicorn.socket
Ensure the /etc/systemd/system/gunicorn.socket file is correct before proceeding.
🔁 Testing Gunicorn Socket Activation
At this stage, gunicorn.service may still be inactive. That’s expected if it hasn’t yet received any connections. You can check this with:
sudo systemctl status gunicorn
Now test the socket by sending a request to it using curl:
curl --unix-socket /run/gunicorn.sock localhost
If everything is working, you should see HTML output from your Django application, and Gunicorn should now be active. Confirm it with:
sudo systemctl status gunicorn
If any issues arise, inspect Gunicorn’s logs:
sudo journalctl -u gunicorn
If you’ve made changes to your service file, be sure to reload systemd and restart Gunicorn:
sudo systemctl daemon-reload
sudo systemctl restart gunicorn
🔍 Tip: Make sure the socket file and service configuration are correct before continuing with the Nginx configuration.
Step 6: Configure Nginx
sudo nano /etc/nginx/sites-available/project_name
Paste:
server {
    listen 80;
    server_name yourdomain.com;

    location = /favicon.ico { access_log off; log_not_found off; }
    location /static/ {
        root /var/www/project_name/src;
    }

    location / {
        include proxy_params;
        proxy_pass http://unix:/run/gunicorn.sock;
    }

    client_max_body_size 100M;
}
sudo ln -s /etc/nginx/sites-available/project_name /etc/nginx/sites-enabled
sudo nginx -t
sudo systemctl reload nginx
✅ Your Django App is Now Deployed!
💡 Want HTTPS? Add Let's Encrypt with Certbot for a free SSL certificate.
Request A Call Back
Ever find yourself staring at your computer screen a good consulting slogan to come to mind? Oftentimes.